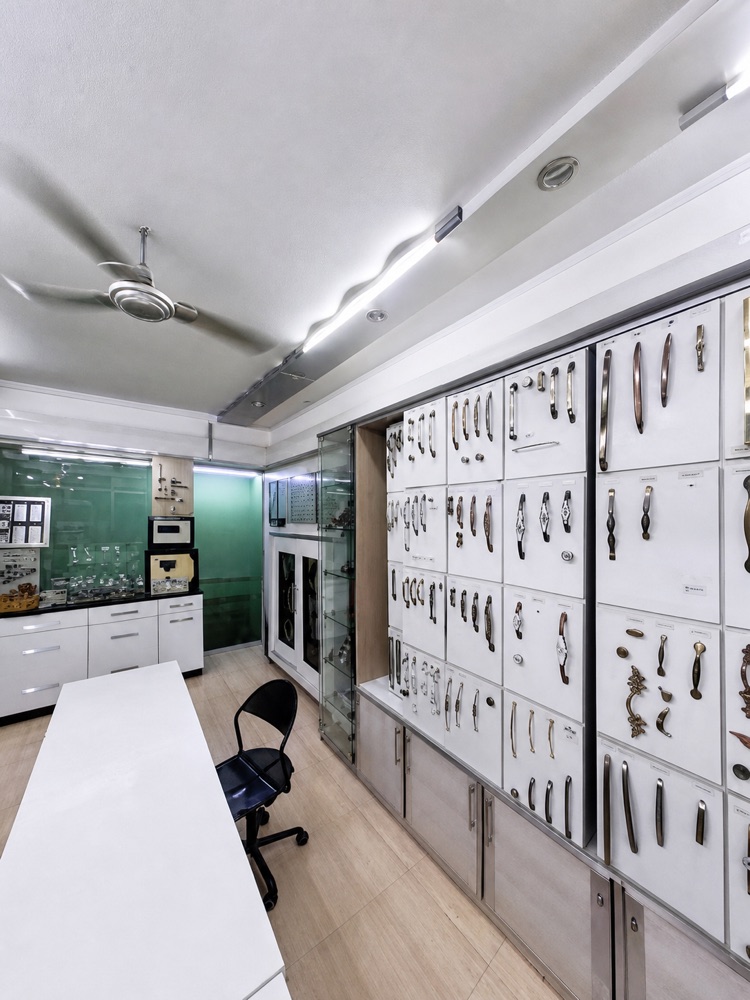
Furniture hardware display wall in Surat

A practical guide from Bharmal Hardware Khazana, Bhagal, Surat

Start with the requirement, not the product name

For multi-unit projects, repeatable schedules protect quality, procurement timing and maintenance planning. This guide focuses on hardware specification, procurement consistency and customer experience for Surat builders. It is written for builders, developers, procurement teams and homebuyers who want to make a well-informed decision instead of relying on a product photograph, a vague name or a last-minute substitution. A practical choice begins by defining what has to work: the opening, furniture piece or surface involved; the material; the dimensions; the environment; the quantity; and the expected daily use.

At Bharmal Hardware Khazana, the aim is not to make a simple decision feel complicated. It is to surface the details that matter before money and time are committed. A handle, hinge, lock, closer, pull-out, board or laminate performs best when it is matched to the job it has to do. The same principle applies whether the requirement is one replacement, a home renovation, a commercial fit-out or a multi-unit project.

The first useful question is always about the application. Is the item used on a wooden, glass, aluminium or cabinet door? Is it exposed to moisture, heavy traffic or repeated movement? Does it need to coordinate with a visible finish, or is reliability the main priority? Clear answers narrow the product range quickly and create a better starting point for comparison.

The details that decide whether hardware will work

Measurements are equally important. Door thickness, shutter width, panel size, opening direction, drilling position, board thickness and available clearance can affect compatibility. When those facts are missing, a photograph of the existing fitting, a simple sketch or an old sample can be more useful than a product name. It helps the showroom team compare the real requirement with the available options.

A good comparison has three layers: function, fit and finish. Function asks whether the product can perform the required task. Fit checks dimensions, fixing and compatibility with the material. Finish considers colour, texture, sheen and how the visible hardware sits beside the door, laminate, stone, glass or cabinet. Starting in that order avoids choosing a beautiful object that is not appropriate for the application.

For larger projects, document the decision. A concise schedule should name the location, item type, material, finish, quantity, specification and an approved alternative. This does not need to be a complicated document. Its purpose is to protect the design intention and reduce confusion between the showroom, carpenter, installer, contractor and buyer. When a requirement changes, the schedule makes that change visible rather than accidental.

How to compare options with confidence

Availability should also be part of the conversation. Product ranges, finishes and quantities can change. Asking about a specific model early gives the project team time to compare alternatives rather than making a rushed choice at installation. A reliable supplier will be clear about what is available, what needs to be confirmed and which alternative offers a similar function or appearance.

The best time to visit a showroom is before final drilling, cutting or fabrication. Physical comparison can reveal details a screen misses: how a handle fills the hand, how a hinge moves, whether a finish is warm or cool under light, how a wardrobe pull-out travels, or how a board and laminate read alongside one another. That small investment of time can prevent avoidable rework.

For customers using online research, a digital enquiry is still valuable. Send a well-lit photo, dimensions, quantity, finish preference and a sentence about where the item will be used. If there is an existing fitting, include a close image of the fixing area. This gives the conversation enough context to start product matching before a visit, while keeping the final decision grounded in the real project.

Specification, installation and long-term value

Budget should be discussed honestly. There is rarely one universally correct price point because material, finish, mechanism, brand, durability and quantity all affect the result. Instead of asking only for the cheapest option, explain the expected use and where the product will be installed. That makes it possible to compare sensible alternatives and understand what changes with each one.

Installation and maintenance deserve attention too. Even a well-selected fitting can underperform if it is fitted into the wrong material, used with unsuitable screws or adjusted incorrectly. Ask who will install the item, whether the relevant preparation has been planned and what routine care the finish requires. This is particularly important for moving mechanisms, locks, closers and products installed in high-use or damp locations.

Finally, keep the customer experience in view. A completed room is remembered through the things people touch every day: the door handle, the lock, the wardrobe movement, the cabinet pull and the consistency of the visible finishes. Treating those details as part of the project—not an afterthought—supports a more dependable result and a more confident handover.

The inspection process can be simple. Lay the relevant samples together: the board or shutter finish, the visible handle or knob, a lock faceplate if applicable and a photograph of the room. Look at the group in neutral light, then step back. The right combination usually feels coherent because its scale, colour temperature and sheen work together. If it feels uncertain in the showroom, it will rarely feel more certain after installation.

Where a project has several stakeholders, decide who gives the final approval. The homeowner may care most about appearance and daily comfort; the designer may protect the overall language; the carpenter may identify installation constraints; the contractor may track programme and quantity; and the supplier may help compare compatible choices. A short review involving those voices at the right moment is often more effective than a long chain of messages after work has started.

A practical review before purchase

Consider lifecycle rather than only the day of purchase. A main entrance handle, frequently used wardrobe system or commercial door closer experiences different wear from a decorative cabinet knob. It may be sensible to invest more in the elements that move often, carry weight or affect security, while selecting a simpler option for lower-use applications. This is not about buying the most expensive item; it is about matching value to the task.

Finishes require their own vocabulary. Polished, brushed, antique, matte and textured surfaces can look very different under warm or cool light. Ask whether the finish is expected to match, contrast or quietly support surrounding materials. Where several rooms are involved, keep a small approved sample set so future procurement remains consistent and replacement choices are easier to make.

Quantity planning can save both time and waste. Count the full requirement, then allow for matching accessories, spare pieces where appropriate and the lead time for a particular range. For a project with many identical doors or drawers, checking one installed sample before the complete order can be a smart risk-control step. It verifies look, function and fixing before the decision is repeated across the site.

There is also value in asking what should be avoided. A product that is unsuitable for moisture, an oversized handle on a light drawer, a lock that does not suit the door preparation or a board that does not meet the intended use can create problems that a nicer photograph will not solve. Responsible guidance is as much about ruling out unsuitable choices as presenting attractive ones.

After purchase, keep the information that will be useful later: invoice, product code, finish name, quantity and a few photographs of the installed item. This makes maintenance, additions and replacements easier. It is especially helpful for landlords, facility managers, builders and families completing work in stages, because the original decision does not have to be reconstructed months later.

The final test is practical: can the customer explain why this product was chosen? If the answer includes the application, fit, finish, budget and expected use, the decision is likely on solid ground. If the answer is only that it was available at the moment, there may still be value in pausing to compare. Good hardware decisions reward a little preparation.

A field-by-field planning framework

Before a product is ordered, map the decision to the exact place it will be used. A main door, bedroom wardrobe, kitchen drawer, bathroom cabinet, office partition and retail counter all create different demands. Start with the user and the motion involved: who will touch it, how often, at what height, with what force and in what environment? This turns a vague request into a specification that can be checked. It also protects the customer from choosing a fitting simply because it looked suitable in an unrelated setting.

Material compatibility is the next checkpoint. The substrate may be solid wood, plywood, MDF, HDF, particle board, laminate-faced board, aluminium, glass or a combination of materials. Each has its own limits for screw holding, drilling, weight and edge treatment. State the board thickness and the proposed fixing method before selecting a mechanism. A product can be excellent in isolation and still fail when it is asked to work with the wrong shutter, an undersized fixing or an unplanned recess.

Think about movement and clearance as early as possible. Doors need room to swing, drawers need room to pull out, sliding systems need straight tracks and soft-close mechanisms need the right setup. A handle may project into a passage; a lock may conflict with a frame; a pull-out may need a defined internal cabinet depth. Sketches do not have to be elaborate. A quick plan, a photograph with dimensions or a sample cabinet drawing can reveal conflicts while they are still easy to solve.

For a visible finish, compare samples in the lighting closest to the finished space. Daylight, warm interior lighting and cool LEDs can change how brass, black, chrome, steel, woodgrain and laminate tones appear. Look at the finish beside the cabinet, door or wall surface rather than against a showroom display alone. Decide whether the hardware should be a calm supporting detail, a clear contrast or a matching element. Naming that intention makes it much easier to choose consistently across a room or project.

Quantity and timing belong in the same conversation. Count every opening, drawer or cabinet line; identify left and right handing where relevant; and note matching locks, cylinders, catches, screws or accessories. Then check the project sequence. Is the product needed before fabrication, before polishing, at final installation or only at handover? Clear quantities and milestones help avoid a situation where a carpenter is ready but the selected item has not yet been finalised or its required accessories were overlooked.

Assign responsibility for each handover point. The designer can confirm the visual language, the carpenter can verify preparation and fixing, the contractor can coordinate timing, and the customer can approve the final sample. The showroom can help compare product options against those inputs. This is not unnecessary formality: it is a practical way to ensure that a decision is understood by the people who will buy, prepare, install and use the item. One agreed sample can resolve many later questions.

Where a project repeats the same detail, make a small reference record. Photograph the approved sample, list its product code and finish, and note the exact location where it is used. This simple record helps when an additional room is added, a quantity changes or a replacement is needed years later. It also gives contractors and site teams a shared point of reference. Consistency is easier to protect when the decision exists as more than a memory or a message thread.

A final site review should happen before the full order is released where the detail is important or repeated. Confirm dimensions on the actual shutter or cabinet, test the intended movement and inspect the finish alongside surrounding materials. If a minor change is needed, it is far less disruptive at sample stage than after every opening has been prepared. This measured approach helps buyers, designers and project teams keep quality high without treating every small choice as a complicated technical exercise.

After installation, a short maintenance conversation preserves the result. Ask how moving parts should be cleaned, whether fasteners may need periodic checking and which surfaces should avoid abrasive cleaners. Retain spare keys, product codes and warranty information where provided. These habits are especially useful in busy homes, hospitality spaces and commercial interiors, where the fittings are used continuously. Thoughtful selection and simple care together are what turn a good-looking hardware decision into a durable one.

If a requirement is urgent, separate the essential from the merely desirable. The essential detail is the function that must be solved now: a secure lock, a working hinge, a compatible drawer channel, a suitable board or a handle that can be fitted correctly. The desirable detail may be a particular finish, profile or branded range. This distinction helps a buyer compare realistic alternatives without losing sight of the project’s original intent. It also makes conversations more transparent when timing or availability affects the choice.

For renovation work, expect the existing condition to matter. Older doors, cabinets and frames may not be perfectly square, and previous drilling or repairs can change what will fit. Measure the actual installation point rather than relying only on an old invoice or a standard size. If possible, bring the removed fitting or clear photographs from multiple angles. A few minutes spent checking the real condition can avoid ordering a product that is theoretically close but impractical to install cleanly.

A strong specification remains understandable to the person who will use it. Avoid relying only on trade shorthand or a product photograph with no dimensions. Add the item location, a plain-language function, the material or substrate, dimensions, finish, quantity, fixing notes and the approved alternative. When everyone can read the document in the same way, purchasing becomes easier to audit and the finished result is more likely to reflect the decision the customer actually made.

Before you buy

Bring these details to the showroom.

  • A photo or drawing of the application
  • Measurements, material and thickness
  • Quantity and intended daily use
  • Samples of laminate, board, paint or metal where relevant
  • Your preferred finish and realistic budget range
  • The old fitting when replacing an existing item

Quick answers

Common questions

How can builders make hardware procurement more consistent?

Create a schedule by door type, room, finish, quantity and approved alternative, then review it before ordering.

What should homebuyers check in a builder's hardware specification?

Ask about brand, material, finish, lock type, warranty, maintenance and whether the installed item matches the schedule.

Where can I find builder information in Surat?

Use recognised association and regulatory sources, check project approvals and verify the details of the specific project.

A specific requirement?

Share a photo or measurement for practical guidance.

Ask on WhatsApp